Install WordPress with Nginx and Let’s Encrypt Certbot SSL on Debian 10
Welcome to our tutorial on how to install WordPress with Nginx and Let’s Encrypt SSL on Debian 10. WordPress is a PHP-based free and open-source content management system that is commonly used to construct free websites and personal blogs. WordPress enables you to create a website that is tailored to your specific requirements. With WordPress, you can create a blog, a company website, a portfolio, an online store, or anything else you can think of.
WordPress Features
The following are WordPress features;
- Adding, moving and deleting dashboard widgets
- Widget Accessibility Mode
- Editing images
- Embedding links, videos and multimedia
- Pasting URL’s in Visual Editor to create links
- Themes can be viewed without being activated
- Showing or hiding items using Screen Options
Install WordPress with Nginx and Let’s Encrypt SSL on Debian 10
Before we can start WordPress installation on Debian 10, we have to update and upgrade the system.
We run the system update and upgrade to make sure system packages are current.
sudo apt update
sudo apt upgrade
After system update and upgrade is completed, follow the steps below to install WordPress with Nginix on Debian 10.
Step 1. Install LEMP Stack on Debian 10
The LEMP stack stands for Linux, ENginx, MySQL|MariaDB, and PHP, which are all regularly used web for application and deployment components.
a) Install Nginx Web Server
The Nginix web server is in charge of the servers that host web applications. We may use the following command to install it:
sudo apt install nginx
Once the Nginx web server is installed, execute the following command to see if it’s up and running:
$ systemctl status nginx
● nginx.service - A high performance web server and a reverse proxy server
   Loaded: loaded (/lib/systemd/system/nginx.service; enabled; vendor preset: enabled)
   Active: active (running) since Fri 2021-07-09 16:51:19 UTC; 11h ago
     Docs: man:nginx(8)
  Process: 661 ExecStartPre=/usr/sbin/nginx -t -q -g daemon on; master_process on; (code=exited, status=0/SUCCESS)
  Process: 662 ExecStart=/usr/sbin/nginx -g daemon on; master_process on; (code=exited, status=0/SUCCESS)
 Main PID: 663 (nginx)
    Tasks: 3 (limit: 2376)
   Memory: 3.6M
   CGroup: /system.slice/nginx.service
           ├─663 nginx: master process /usr/sbin/nginx -g daemon on; master_process on;
           ├─664 nginx: worker process
           └─665 nginx: worker process
Jul 09 16:51:19 debian10 systemd[1]: Starting A high performance web server and a reverse proxy server...
Jul 09 16:51:19 debian10 systemd[1]: Started A high performance web server and a reverse proxy server.
According to the above output, Nginx web server is active and running. In case it’s not running you can start using the following command.
systemctl start nginx
b) Install MariaDB | MySQL Database Server
You have the option of using MariaDB or MySQL as your database server. We’ll set up the MariaDB database server as follows:
sudo apt install mariadb-server mariadb-client
After installing MariaDB database, you can if it’s running using the following command:
$ systemctl status mariadb
● mariadb.service - MariaDB 10.3.29 database server
   Loaded: loaded (/lib/systemd/system/mariadb.service; enabled; vendor preset: enabled)
   Active: active (running) since Sat 2021-07-10 04:11:32 UTC; 1min 28s ago
     Docs: man:mysqld(8)
           https://mariadb.com/kb/en/library/systemd/
 Main PID: 4336 (mysqld)
   Status: "Taking your SQL requests now..."
    Tasks: 31 (limit: 2376)
   Memory: 73.8M
   CGroup: /system.slice/mariadb.service
           └─4336 /usr/sbin/mysqld
Jul 10 04:11:32 debian10 systemd[1]: Starting MariaDB 10.3.29 database server...
Jul 10 04:11:32 debian10 mysqld[4336]: 2021-07-10  4:11:32 0 [Note] /usr/sbin/mysqld (mysqld 10.3.29-MariaDB-0+deb10u1) starting as process 4336 ...
Jul 10 04:11:32 debian10 systemd[1]: Started MariaDB 10.3.29 database server.
Jul 10 04:11:32 debian10 /etc/mysql/debian-start[4371]: Upgrading MySQL tables if necessary.
Jul 10 04:11:33 debian10 /etc/mysql/debian-start[4432]: Checking for insecure root accounts.
Otherwise you can start MariaDB using the following command:
sudo systemctl start mariadb
You can also check if MariaDB database is enable:
$ systemctl is-enabled mariadb enabled
Access the root user shell once the database server has been installed;
sudo mysql -u root
Create a WordPress database and user;
CREATE DATABASE wp_db;
CREATE USER 'wpadmin'@'localhost' identified by 'StrongPassword';
GRANT ALL PRIVILEGES ON wp_db.* TO 'wpadmin'@'localhost';
FLUSH PRIVILEGES;
Remember to change StrongPassword to your database user password.
Verify that the user can login to the database using the password provided:
$ mysql -u wpadmin -p
Enter password: <ENTER PASSWORD>
Welcome to the MariaDB monitor.  Commands end with ; or \g.
Your MariaDB connection id is 51
Server version: 10.3.29-MariaDB-0+deb10u1 Debian 10
Copyright (c) 2000, 2018, Oracle, MariaDB Corporation Ab and others.
Type 'help;' or '\h' for help. Type '\c' to clear the current input statement.
MariaDB [(none)]> SHOW DATABASES;
+--------------------+
| Database           |
+--------------------+
| information_schema |
| wp_db              |
+--------------------+
2 rows in set (0.000 sec)
MariaDB [(none)]> EXIT
Bye
c) Install PHP and required Extensions
WordPress works with the PHP that comes standard with Debian 10. We’ll set up PHP and the necessary extensions, such as fpm, mysql, zip, and so on.
sudo apt install php php-{fpm,pear,cgi,common,zip,mbstring,net-socket,gd,xml-util,mysql,gettext,bcmath}
Step 2. Download and Install WordPress on Debian 10
The most recent version of WordPress is now available for download and installation;
We will use wget command to download our WordPress, first let’s install this tool;
sudo apt install wget
Download WordPress;
wget wordpress.org/latest.tar.gz
After downloading successfully run the following command to extract the archive;
tar xvf latest.tar.gz
To your Web Document Root, move the resultant directory.
sudo mv wordpress /var/www/html/mywp-site
Create a database connection for WordPress;
cd /var/www/html/mywp-site
sudo cp wp-config-sample.php wp-config.php
Edit wp-config.php with the text editor of your choice.
sudo vim wp-config.php
Make the following configuration as per the database information above:
// ** MySQL settings - You can get this info from your web host ** //
/** The name of the database for WordPress */
define( 'DB_NAME', 'wp_db' );
/** MySQL database username */
define( 'DB_USER', 'wpadmin' );
/** MySQL database password */
define( 'DB_PASSWORD', 'StrongPassword' );
/** MySQL hostname */
define( 'DB_HOST', 'localhost' );
/** Database Charset to use in creating database tables. */
define( 'DB_CHARSET', 'utf8' );
/** The Database Collate type. Don't change this if in doubt. */
define( 'DB_COLLATE', '' );
Change web user’s ownership of /var/www/html/mywp-site:
sudo chown -R www-data:www-data /var/www/html/mywp-site
Step 3. Configure Nginx Web Server Host for WordPress installation
For our WordPress website, we’ll need to build a Virtual Host configuration file.
sudo vim /etc/nginx/conf.d/mywp-site.conf
Add the following content to the config file above;
##################################
# WORDPRESS NGINX CONFIGURATIONS
##################################
server {
listen 80;
root /var/www/html/mywp-site;
server_name blog.hirebestengineers.com;
access_log /var/log/nginx/wp_client_access.log;
error_log /var/log/nginx/wp_client_error.log;
location / {
    index                               index.php index.html;
    try_files                           $uri $uri/ /index.php?$args;
}
}
Remember to replace;
- /var/www/html/mywp-site with your document root.
- blog.hirebestengineers.com with your WordPress installation domain name.
Save and exit the config file above.
Now verify the configuration syntax above:
$ sudo nginx -t
nginx: the configuration file /etc/nginx/nginx.conf syntax is ok
nginx: configuration file /etc/nginx/nginx.conf test is successful
Restart and enable the Nginx Web Server.
sudo systemctl restart nginx
sudo systemctl enable nginx
Step 4. Securing WordPress Site with Let’s Encrypt SSL
We’ll use the Certbot tool to install Let’s Encrypt SSL and generate a free SSL certificate to protect WordPress site. Install Certbot tool using the command below:
sudo apt install certbot python3-certbot-nginx
After installing Certbot, let’s now generate Free Let’s Encrypt SSL certificate for Nginx.
sudo certbot --nginx
You will be prompted to enter your email address, do so and answer series of questions according.
Saving debug log to /var/log/letsencrypt/letsencrypt.log
Plugins selected: Authenticator nginx, Installer nginx
Enter email address (used for urgent renewal and security notices) (Enter 'c' to
cancel): [email protected]
- - - - - - - - - - - - - - - - - - - - - - - - - - - - - - - - - - - - - - - -
Please read the Terms of Service at
https://letsencrypt.org/documents/LE-SA-v1.2-November-15-2017.pdf. You must
agree in order to register with the ACME server at
https://acme-v02.api.letsencrypt.org/directory
- - - - - - - - - - - - - - - - - - - - - - - - - - - - - - - - - - - - - - - -
(A)gree/(C)ancel: A
- - - - - - - - - - - - - - - - - - - - - - - - - - - - - - - - - - - - - - - -
Would you be willing to share your email address with the Electronic Frontier
Foundation, a founding partner of the Let's Encrypt project and the non-profit
organization that develops Certbot? We'd like to send you email about our work
encrypting the web, EFF news, campaigns, and ways to support digital freedom.
- - - - - - - - - - - - - - - - - - - - - - - - - - - - - - - - - - - - - - - -
(Y)es/(N)o: Y
Which names would you like to activate HTTPS for?
- - - - - - - - - - - - - - - - - - - - - - - - - - - - - - - - - - - - - - - -
1: blog.hirebestengineers.com
- - - - - - - - - - - - - - - - - - - - - - - - - - - - - - - - - - - - - - - -
Select the appropriate numbers separated by commas and/or spaces, or leave input
blank to select all options shown (Enter 'c' to cancel): 1
Obtaining a new certificate
Performing the following challenges:
http-01 challenge for blog.hirebestengineers.com
Waiting for verification...
Cleaning up challenges
Deploying Certificate to VirtualHost /etc/nginx/conf.d/mywp-site.conf
Please choose whether or not to redirect HTTP traffic to HTTPS, removing HTTP access.
- - - - - - - - - - - - - - - - - - - - - - - - - - - - - - - - - - - - - - - -
1: No redirect - Make no further changes to the webserver configuration.
2: Redirect - Make all requests redirect to secure HTTPS access. Choose this for
new sites, or if you're confident your site works on HTTPS. You can undo this
change by editing your web server's configuration.
- - - - - - - - - - - - - - - - - - - - - - - - - - - - - - - - - - - - - - - -
Select the appropriate number [1-2] then [enter] (press 'c' to cancel): 2
Redirecting all traffic on port 80 to ssl in /etc/nginx/conf.d/mywp-site.conf
- - - - - - - - - - - - - - - - - - - - - - - - - - - - - - - - - - - - - - - -
Congratulations! You have successfully enabled
https://blog.hirebestengineers.com
You should test your configuration at:
https://www.ssllabs.com/ssltest/analyze.html?d=blog.hirebestengineers.com
- - - - - - - - - - - - - - - - - - - - - - - - - - - - - - - - - - - - - - - -
IMPORTANT NOTES:
 - Congratulations! Your certificate and chain have been saved at:
   /etc/letsencrypt/live/blog.hirebestengineers.com/fullchain.pem
   Your key file has been saved at:
   /etc/letsencrypt/live/blog.hirebestengineers.com/privkey.pem
   Your cert will expire on 2021-10-08. To obtain a new or tweaked
   version of this certificate in the future, simply run certbot again
   with the "certonly" option. To non-interactively renew *all* of
   your certificates, run "certbot renew"
 - Your account credentials have been saved in your Certbot
   configuration directory at /etc/letsencrypt. You should make a
   secure backup of this folder now. This configuration directory will
   also contain certificates and private keys obtained by Certbot so
   making regular backups of this folder is ideal.
 - If you like Certbot, please consider supporting our work by:
   Donating to ISRG / Let's Encrypt:   https://letsencrypt.org/donate
   Donating to EFF:                    https://eff.org/donate-le
 - We were unable to subscribe you the EFF mailing list because your
   e-mail address appears to be invalid. You can try again later by
   visiting https://act.eff.org.
As highlighted above, we have successfully Secure WordPress site with Let’s Encrypt SSL.
Step 5. Finish WordPress Installation
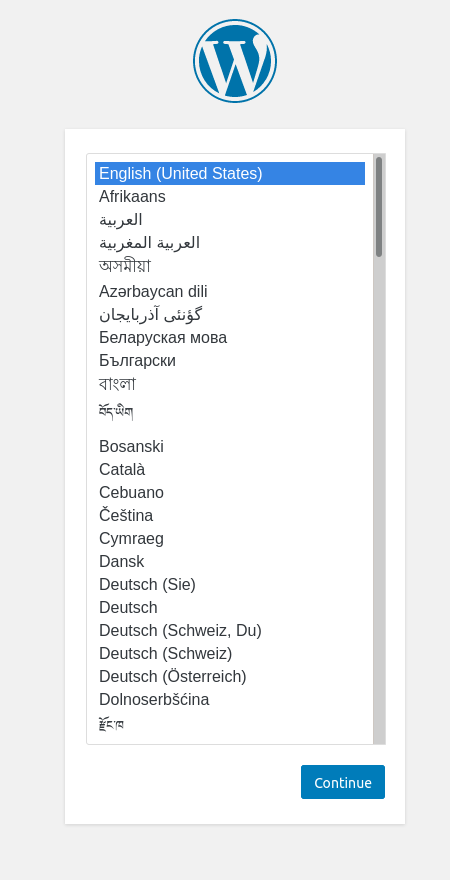
Let’s now access WordPress in our browser using https://setupvm.com/ link to proceed our installation. We will see the WordPress Installation Wizard as shown below. Select your preferred language and click ‘continue‘.
A. Choose language

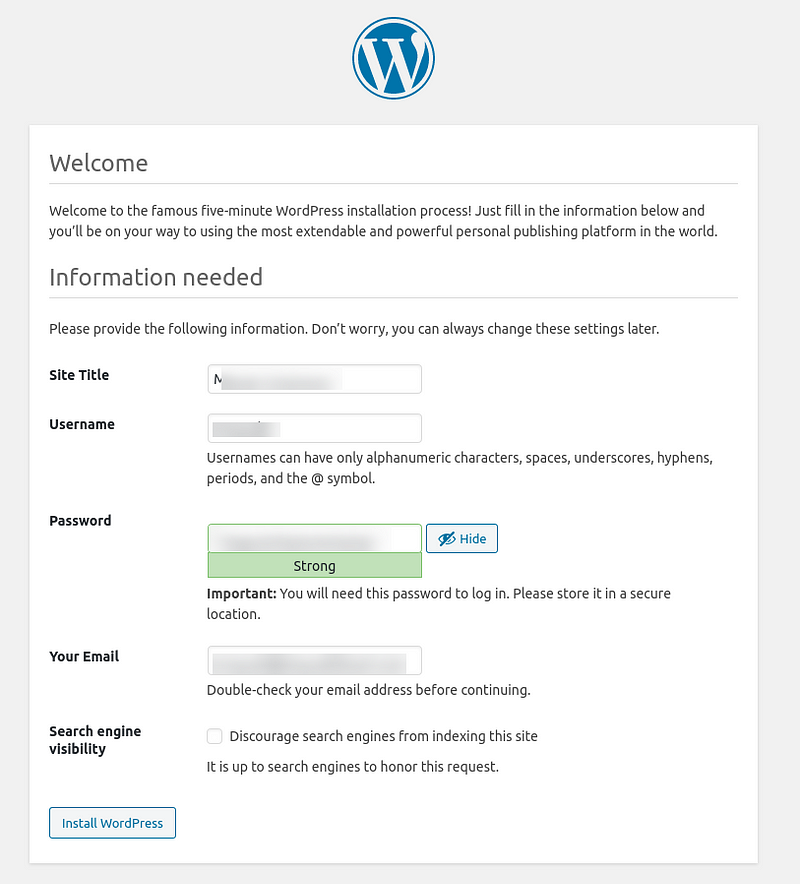
B. Fill in details like sitename, username, password and administrative email, then click install button.

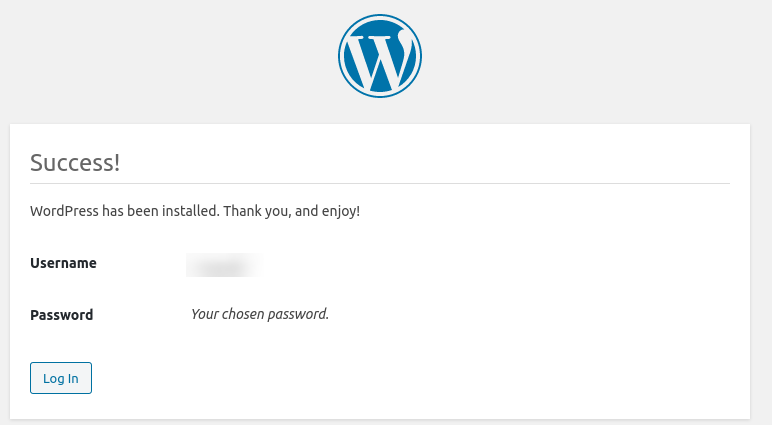
C. Once installation is done, login with your selected username and password.

D. Your dashboard appears and you’re done with installation.

Conclusion
Fantastic! to this far end , we have showed how to install WordPress with Nginx and Let’s Encrypt SSL on Debian 10, you have also learned how to secure WordPress with Let’s Encrypt SSL. Feel free to ask any question in the comment below and we will reach as soon as possible. Enjoy using WordPress to create a blog, a company website, a portfolio, an online store and many more.
